![]()
Getting down and dirty is always fun, particularly when you doing something to your own home. To create your own space and be able to feel proud of all of the work that you have done is a great way to add personal touches to your own home. It also allows you to spend quality time with individuals who can help you with your projects and can be an ideal excuse for a brief getaway from the drudgery of daily life. Also, it can be a great way to enjoy some entertainment and sport and end up being a fun day to play around. Then there is all the money you can save and since it is fairly easy to install your own window blinds, it all starts to sound like lots of fun. However, it is important to note that there are always risks involved with handling any type of hardware and watching out for them is always a good idea.
The following are a couple of techniques and tricks when you start to think about how you can get Houston roller shades installed on inside mounts. The following are a couple of strategies you can consider when doing this:
1. Make Sure You Have Everything You Need
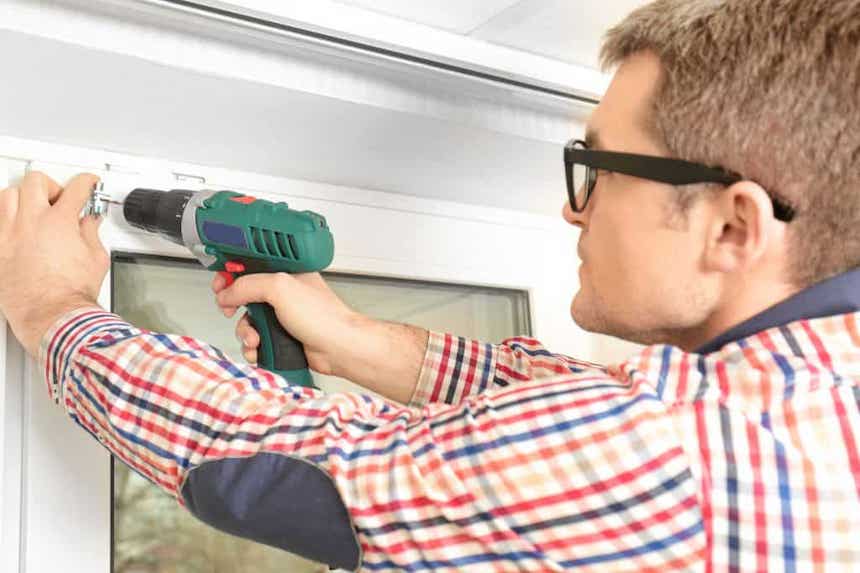
Before you start to assemble your roller shades, it’s a good idea to inspect the package. Many times people have a tendency to overlook that process and start to directly set up the blinds only to discover later on that they are missing something, which can be a real hassle. Looking through the product as well as the hardware you are going to need before you start on your project can come in very handy. Inside mount roller shades are fairly easy to deal with and don’t require a lot of hardware. The following are a couple of things that you will definitely need for your project:
- Measuring tape
- Level
- Drill
- Screwdriver
Before starting on the installation process, make sure you have all of the above things handy. Unbox the product carefully and make sure you understand all of the times that come with it.
2. Read Your Instruction Manual
It might seem excessive to read through the instruction manual each time you are wanting to get a window treatment installed in your house. After all, how different can it be to install light-filtering shades as opposed to roman shades? However, it is always a good idea to read through the product’s instruction manual if you are planning to install it. There could be some tips and quirks that can come in useful for the product you are planning to install. You also may learn something new and that can help make the job easier in the future. There also may be different brackets for various products. Roller shades, for example, come with a cassette valance kind of bracket that is set up in a different way compared to other types of window coverings.
3. Only Use the Hardware Provided by Your Manufacturer
This tip can be very useful to you if you mistakenly thought you could use any hardware for a product. All window treatments have their own requirements, which are fulfilled by the manufacturer when the required hardware is sent out. Door roller blades need different types of screws compared to cordless roller shades or have various types of brackets. Whenever manufacturers send out hardware, they know what you need. This will not only give a smoother finish to your installation, but it will also ensure that the product is more sturdy and stable and will be able to withstand all regular operating conditions.
4. Use a Ruler and Pencil to Mark
In order to provide your installation with a more professional finish, it is critical to market the height of your blind and to place the length of the brackets and screws ahead of time. That will make your future drilling process more uniform and also more convenient. Using a metal scale will confirm the precision and ensure that shades don’t droop from the side. It is also effective to use a measuring tape, however, it is better to use a metal ruler. Direct drilling may make the shades appear uneven or shabby. You can always use an eraser later to remove the pencil marks.
5. Pre-Drill Your Holes
We cannot stress this enough. After using your pencil to mark the place for the screws, and tap on the spot with a hammer and screw to make some starter holes. A machine driller can always be used, but be sure that the hole isn’t so deep that it makes it hard to tighten the screws. That makes the installation process smoother and easier and helps to prevent the wall from getting chipped like it can when the screws are directly put in. Then you can place your brackets and add the screws into place.
6. Hand-Tighten the Screws
It is a good idea to use your hand to tighten down the screws since it helps to ensure that the hold isn’t too deep and that the screws are held tightly in place. That will also ensure a smoother finish and rough edges can be avoided. It is also important to note that not all hardware is intended to be used with drills or other types of equipment and they may break if machines are used. You can always use hand-operated hardware like screwdrivers and pliers to fix the screws.
7. Check the Bracket Positions Ahead of Time
In detailed work, some people have a tendency to forget to do this easy task. Make sure you check which of the brackets goes on each side of the window. Place it on both sides of your window shade before drawing the marks and drilling the holes. One of the bracket’s sides has a spring idle end while the other one has a round-pin end. Read the instructions and physically check which one goes on the left and which one goes on the right.
8. Carefully Mount the Shades
This is, of course, the most important of the installation process for inside mount roller shades. Hold your shade in place and first put the shade onto the round-pin end. The push it onto the spring idle side. That is the most proven and effective method to get the shades in place.
9. After Installing Always Check to Ensure the Shades Are Firmly in Place
Before you consider your installation successful, make sure to carefully check to see whether you have properly set up the shades. Some screws might remain loose and later fall down and cause a fatal accident, especially to the elderly, children, or pets. Move around the blinds and raise and lower them a couple of times. You can gently tug on them as well to check the window shades’ stability.
- Understanding Why Digital Transformation Is Important for Business Expansion - December 17, 2019
- Creative Ideas About Deck Trends for 2020 - December 16, 2019
- Tips on Driving Habits That Can Help to Increase the Life-Span of Your Car - October 29, 2019
More from Anne Cohen Writes
 All You Should Know About Roller Shutters
 Simple Ways To Make Your Older Home Look Brand New Again
 New and Improved: The Process of Replacing Your Front Door
 Importance of Window Cleaning and the Role of Specialists
 Preparing for a Summer Storm, Dos and Don’ts
 How To Maintain Privacy in the Bedroom With Window Blinds